INVENTORY CONTROL: PART 2
by David de Almeida Bezerra Júnior
In this section, we will build the database and the registration screens.
Building the database
In The Database Manager MySQL (left sidebar), create the following tables with the following fields:
Table: customer
| Column | Type |
|---|---|
| id | int not null primary key |
| name | varchar(50) not null |
| address | varchar(50) |
| phone | varchar(14) |
| varchar(50) |
Table: product
| Column | Type |
|---|---|
| id | int not null primary key |
| description | varchar(50) not null |
| price | decimal(9, 2) not null |
| amount | decimal(9, 2) |
Table: supplier
| Column | Type |
|---|---|
| id | int not null primary key |
| name | varchar(50) not null |
| address | varchar(50) |
| phone | varchar(14) |
| varchar(50) |
Table: incoming
| Column | Type |
|---|---|
| id | int not null primary key |
| incoming_date | date not null |
| incoming_time | time not null |
| product_id | int not null |
| amount | decimal(9, 2) not null |
| supplier_id | int not null |
Table: sale_header
| Column | Type |
|---|---|
| id | int not null primary key |
| sale_date | date not null |
| sale_time | time not null |
| customer_id | int |
Table: sale_detail
| Column | Type |
|---|---|
| id | int not null primary key |
| sale_header_id | int not null |
| product_id | int not null |
| price | decimal(9, 2) not null |
| amount | decimal(9, 2) not null |
Creating windows
Select the table customer and click the right mouse button in the column list. Select the Create window from entire table.
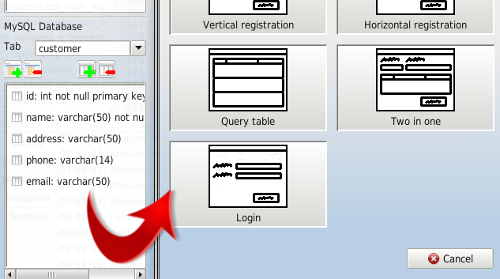
Choose Two in one and name the JDialogCustomer window. Do the same with the product and supplier tables, calling their windows JDialogProduct and JDialogSupplier.
Opening windows
Return to JFrameMain and click the menu item Customer. In the Events tab in the Object Inspector, make double-click the onclick event and add the function openWindow with parameter:
JDialogCustomer
Do the same for the Menu item Product and Supplier, with their windows.
Save and Run the application, clicking on the Toolbar bottuns or typing CTRL + S and F9.

In the next section, we will build the Incoming window.
CopyRight © 2023 Analisa Software.All Rights Reserved.